Tutorials
178. Settings window details
ibisPaint features that allow users to customize the user interface.
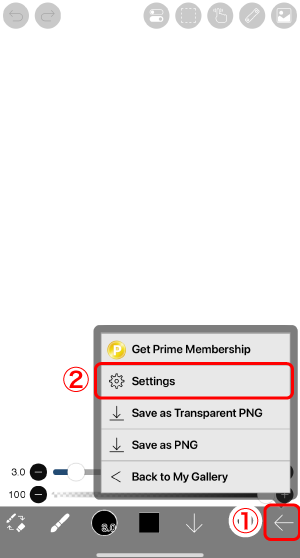
Tap on the ①Back button and select the ②Settings button.
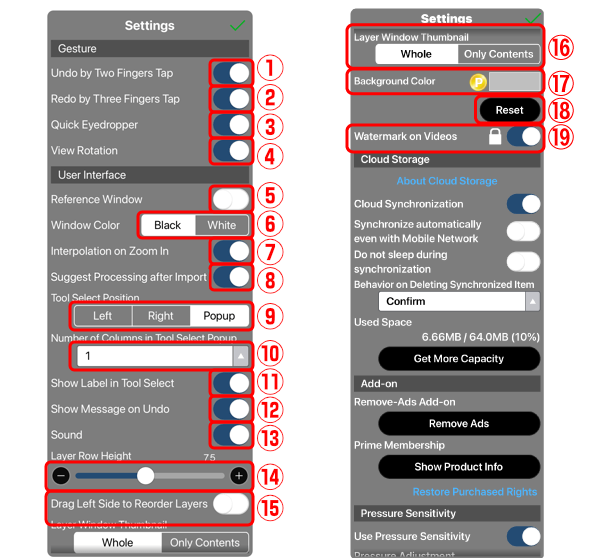
①Undo by Two Fingers Tap … Turn on to enable the Undo Gesture. You can undo by two fingers tap.
②Redo by Three Fungers Tap … Turn on to enable the Redo Gesture. You can redo by three fingers tap.
③Quick Eyedropper … Choose whether to activate the Quick Eyedropper by holding down on the canvas, when using the brush tool. Turn it off when Quick Eyedropper is unintentionally displayed. If it is on, and Quick Eyedropper is unintentionally displayed, hold down with 2 fingers, without letting go, to cancel the Quick Eyedropper function.
⑤Time for Activation of Quick Eyedropper … Sets the time it takes for the Quick Eyedropper to activate when you long-press on the canvas while using the Brush tool. Turn on ④Customize Time for Activation of Quick Eyedropper, and adjust the time using the slider.
⑥View Rotation … Choose whether to rotate the canvas with 2 fingers.
⑦Reference Window … Displays the Reference Window when turned on. You can also toggle its visibility from the View Menu.
⑧Window Color … Select the color theme for the window interface.
⑨Interpolation on Zoom In … If the interpolation is on when the canvas is enlarged for display, it will appear blurred, and if it is off, it will look pixelated.
⑩Default Value of Display When Zoomed … When creating an artwork file, this setting determines how the “Display When Zoomed” of the artwork will be determined. The “Zoom In” setting can be changed from the View menu. For an explanation of “Display When Zoomed”, please refer to “View Menu details”.
⑪Suggest Processing after Import … Choose whether to display an alert suggesting the image processing after importing a picture. Even when it is turned off, you still can use the "Line Drawing Extraction" filter or the "Background Removal" filter later in the Filter tool. If you do not need to process pictures often, it is better to turn this option off.
⑫Tool Select Position … Set where you want the the Tool Select window to appear.
⑬Number of Columns in Tool Select Popup … Set the number of columns in Tool Select Popup to 1-3 columns. Depending on the screen size of the device that you are using, more columns than the designated number may be displayed.
⑭Show Label in Tool Selection … If this is turned off, tool names are not displayed, when Tool Selection window is opened.
⑮Show Message on Undo … When turned off, it hides the message that is displayed when doing "Undo" or "Redo".
⑯Sound … When turned off, you can mute the sound effects such as “Undo” and “Redo.” Even when turned on, if the device is set to "Mute mode," There will be no sound effects.
⑰Layer Row Height … Sets the layer row height in the “Layer window.”
⑱Layer Row Height (Floating) … Sets the row height for layers in the "Floating Layer Window", which appears when you tap the floating window button or drag the move bar in the layer window. The Floating Layer Window is available only on tablet and Windows devices.
⑲Drag Left Side to Reorder Layers … When you turn it on, you can drag the left end of a layer to reorder the layers.
⑳Layer Window Thumbnail … Select “Whole” to display the entire layer in the thumbnail. Select “Only Contents” to display only the part that is being drawn in the thumbnail.
㉑Background Color … Set the background color of the canvas screen. This feature is a Prime feature in the iOS/Android version and a Pro feature in the Windows version.
㉒Reset … Return the set screen background color to the default color.
㉓Watermark on Videos … If you disable this option, the watermark (ibisPaint logo) that is displayed when a video is played back will not be displayed.
㉔Disable Contents Layer Selection function when using Eyedropper … When enabled, the Layer Selection button (which displays the layer name containing the content under the touched position) will no longer appear when activating the Quick Eyedropper by long-pressing the Canvas with the Brush tool.
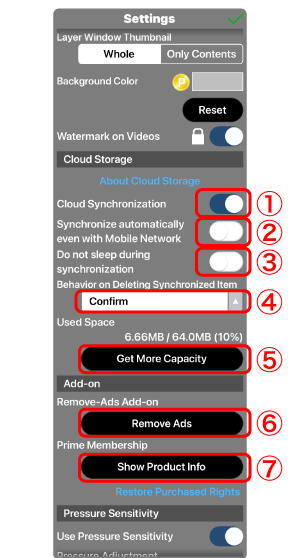
①Cloud Synchronization … Syncs the Cloud Storage and local files.
②Synchronize automatically even with Mobile Network … Turn off to disable automatic syncing of the Cloud Storage and local files when with a mobile network (syncing can be done manually). When turned on, the Cloud Storage and local files will be synced automatically even with a mobile network.
③Do not sleep during synchronization … Prevents your device from sleeping while the clouds storage and local files are syncing. As syncing will stop temporarily while your device is asleep, please turn this switch on if you have many artworks and it will take some time to sync.
④Behavior on Deleting Synchronized Item … Sets the behavior when deleting synced files. If you select “Confirm,” you will be able to select the behavior when deleting your artwork every time. If you select “Delete Only Local File,” only the local file will be deleted, and the cloud file will remain. If you select “Delete File on Cloud As Well,” both the cloud and local files will be deleted.
⑤Get More Capacity … You can increase the capacity of Cloud Storage from 64MB to 20GB if you purchase Prime Membership.
⑥Remove Ads … Opens "Remove-Ads Add-on" product page.
⑦Show Product Info … Opens "Prime Membership" product page.
⑧Redeem Promo Code … Opens the "Promo Code" input page. This button is not available on iPhone or iPad versions.
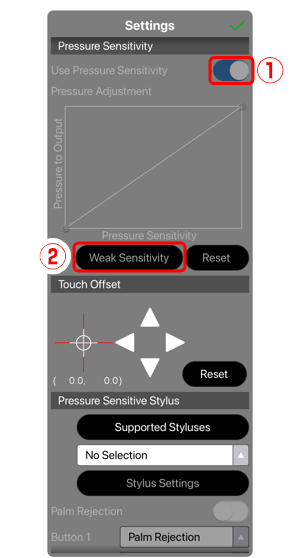
①Use Pressure Sensitivity … If the Pressure Sensitivity is turned on, fine adjustments can be made to the brush pressure. It will appear gray if Pressure Sensitivity does not apply to a particular device or a compatible digital stylus is not connected.
②Weak Sensitivity … Pressure sensitivity will decrease from the default setting.
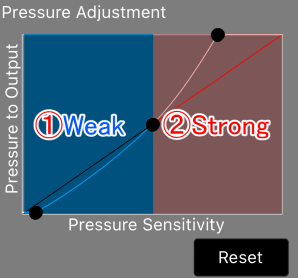
It is set such that going ①left yields lesser brush pressure, going ② right yields greater brush pressure.
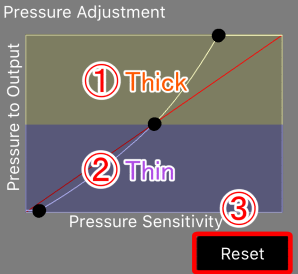
When the curve on the graph is raised ①higher, the line gets thicker, and when it is brought ②lower, the line gets thinner. Depending on the brush, thicker lines are more opaque, and conversely, thinner lines are less opaque.
To return the brush pressure to the initial level, press ③reset button.
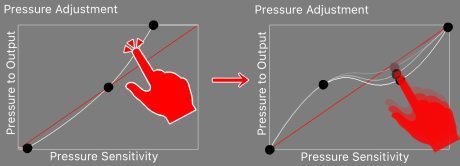
Fine adjustments can be made for Pressure Sensitivity. While there are 3 knobs initially, it is possible to add knobs by tapping on the curve without knobs, in order to make a more detailed setting.
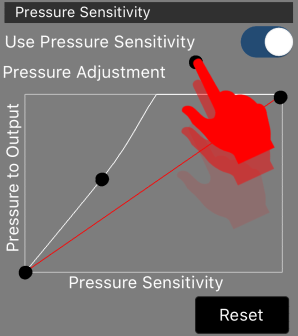
Knobs can be deleted by dragging them outside of the frame.
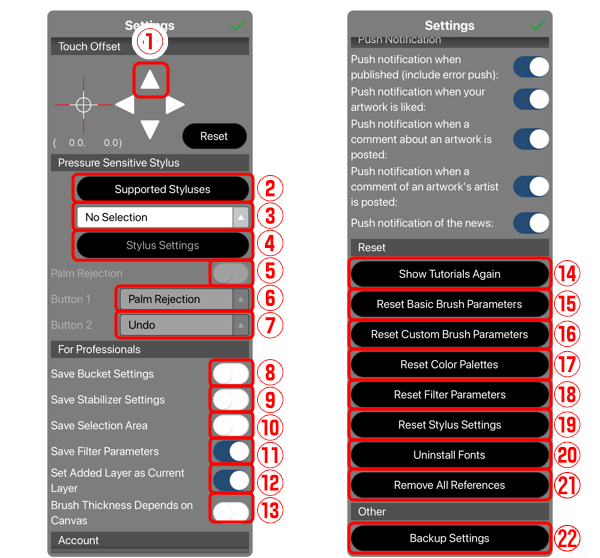
①Touch Offset … If it feels a bit off, when drawing with a stylus or a finger, tap the ①arrow for Touch Offset to change the positioning. This function is mainly for the stylus.
②Supported Stylus … It shows a list of digital styluses that are compatible with ibis Paint. A digital stylus refers to a stylus with batteries, and is capable of communicating with a device. Many of the digital styluses are compatible with the pressure sensitivity.
③Selecting a digital stylus … Select a digital stylus to connect a digital stylus with ibis Paint. Please refer to the user's manual for your digital stylus for instructions on how to connect it.
④Stylus Settings … This screen is for setting the digital stylus after connecting the digital stylus with ibisPaint. Some digital stylus doesn't have a setting screen.
⑤Palm Rejection … When the Palm Rejection is turned on, after connecting a digital stylus, like Wacom's stylus, it becomes possible to draw with your palm resting on the surface. Unfortunately, the surface becomes unresponsive to fingers as well, such that it will not be possible to zoom-in or zoom-out the canvas. It is convenient to assign Palm Rejection on/off button to Button 1 on the stylus.
⑥Show Thickness Mark while Hovering … Displays a mark on the screen indicating brush thickness while the stylus is hovering.
⑦Show Cross Mark while Hovering … Displays a cross mark showing the pen tip position while the stylus is hovering.
⑧Button 1 … Some digital stylus have one or two buttons. If there is more than one button, you can set the function when button 1 is pressed here. You can set an undo function and switch between brush and eraser with the button.
⑨Button 2 … Some digital stylus have one or two buttons. If there are two or more buttons, you can set the function when button 2 is pressed here.
⑩Save Bucket Settings … If turned off, when you return to "My Gallery", your Bucket Properties window settings will revert from your settings back to the initial settings. If you wish to save your settings, turn this switch on.
⑪Save Stabilizer Settings … When you return to My Gallery, the settings for the Stabilizer window will return to their initial values except for the Stabilizer value, Method, Fill, Current Color and Fill Color. Turn on this switch if you want to keep the previous settings when you enter the canvas screen again.
⑫Save Selection Area … When turned off, the selected area will be reset when returning to My Gallery.
⑬Save Filter Parameters … When turned off, Filter Parameters will be reset to the initial values when switching filters or returning to My Gallery.
⑭Save Adjustment Layer Parameters … When turned off, Adjustment Layer parameters will reset to default when switching Adjustment Layers or returning to My Gallery.
⑮Set Added Layer as Current Layer … When turned off, the added layer won't become a working layer, and the current layer will be the working layer.
⑯Brush Thickness Depends on Canvas … When turned off, the brush thickness will always be the same size, regardless of canvas size. When turned on, the brush thickness changes according to the size of the canvas.
⑱Texture Memory Size … Sets the memory used for creating artwork. Turn off ⑰Auto Adjust Texture Memory Size to manually adjust using the slider. Increasing it may improve performance but could cause instability. Decreasing it may enhance stability but slow performance. This setting is not shown on the Windows version.
⑲Show Tutorials Again … If you are not familiar with the features, tap on this button to show the tutorials again.
⑳Reset Basic Brush Parameters … Reset all basic brush parameters to their default values.
㉑Reset Custom Brush Parameters … Reset all custom brush parameters to their default values.
㉒Reset Color Palette … Reset the color palette of the Color window to default.
㉓Reset Filter Parameters … Reset all Filter parameters to default.
㉔Reset Adjustment Layer Parameters … Resets all Adjustment Layer parameters to their default values.
㉕Reset Stylus Settings … Reset the Pressure Sensitive Stylus settings.
㉖Uninstall Fonts … If you download a lot of fonts and are worried about the storage, tap this button to delete all downloaded fonts.

To delete individual fonts, tap on the ①Trash, located on the right side of the Font List window.
㉗Remove All References … Deletes all of the images loaded into the “Reference Mode” of the Reference window.
㉘Delete the Brush Pattern images … Deletes all stored Brush Pattern images that were automatically downloaded when using brushes with Original Brush Patterns. The images will be downloaded again automatically when the same brush is used next time.
㉙Settings Backup … Save your app settings such as Brush and Color Palette in a Settings File (ipcfg).
Chapter
-
 01.Introduction
 -
 02.Start Creating an Artwork
 -
 03.Toolbar and Tool Selection
 -
 04.Do Your Draft Sketch by Hand
 -
 05.About Layers
 -
 06.Let's Trace
 -
 07.Undo and Eraser
 -
 08.Fine Tuning Using the Lasso tool
 -
 09.Check by Reflecting Horizontally
 -
 10.Select Colors in the Color window
 -
 11.Use Color Fill for the Undercoat
 -
 12.Turn Clipping On
 -
 13.Making a Gradation (Shading)
 -
 14.Select a color from the canvas or layer
 -
 15.Set the Time before Quick Eyedropper Starts
 -
 16.Create Highlights and Shadows
 -
 17.Paste a Texture
 -
 18.Let's Merge Layers
 -
 19.Sign Your Artwork
 -
 20.View Your Artwork
 -
 21.Post Your Artwork
 -
 22.Share Your Artwork
 -
 23.Open your ibisPaint data in Clip Studio Paint
 -
 24.Prime Membership / Remove Ads Add-on (iOS,iPadOS,Android versions)
 -
 25.Prime Membership / Pro Add-on (Windows Version)
 -
 26.Synchronizing the artworks on your device with Cloud Storage
 -
 27.Save the past state of an Artwork as an IPV file
 -
 28.Rearrange artworks
 -
 29.Artworks Folder Feature
 -
 30.Make custom brush
 -
 31.Create Original Brush Patterns
 -
 32.Installing and Exporting the Custom Brush
 -
 33.Release a Custom Brush to the Online Gallery
 -
 34.Brush Export and Import
 -
 35.Search For Brushes
 -
 36.Display images to use as reference
 -
 37.Add Color to the Analog Image using Multiply
 -
 38.Stabilizer
 -
 39.Layer: Clipping is convenient
 -
 40.Layer: Changing the color with Alpha Lock
 -
 41.Layer: Let's try using Screen Tone
 -
 42.Layer: Selection Layer
 -
 43.Layer: Save Layer as Transparent PNG command
 -
 44.Layer: Naming your layers to manage them
 -
 45.Layer: Rasterize
 -
 46.Layer: Layer Folders
 -
 47.Layer: Folder Move/Transform
 -
 48.Layer: Add Layer from Canvas
 -
 49.Vector Layer
 -
 50.How to edit a brush shape
 -
 51.Contents Layer Selection
 -
 52.Apply Canvas Papers to your canvas
 -
 53.Display Grid on the Canvas
 -
 54.Save canvas as Transparent PNG
 -
 55.Make the background transparent with Eraser Bucket
 -
 56.Bucket Tool: Surrounding Fill / Surrounding Eraser
 -
 57.Putting texture to the floor with Perspective Form
 -
 58.Skirt with Mesh Form
 -
 59.Entering text with Text tool
 -
 60.Creating manga with Frame Divider tool
 -
 61.Enlarging the canvas with Canvas Size
 -
 62.Cutting off the canvas with Trim
 -
 63.Create a Manga Manuscript for Printing
 -
 64.Canvas creation with resolution (dpi) specification
 -
 65.Changing image resolution with Resize
 -
 66.Change canvas Color Mode
 -
 67.Output High-Resolution Images with AI (Artificial Intelligence)
 -
 68.AI Disturbance
 -
 69.Texture with Material tool
 -
 70.Cut, Copy, Paste
 -
 71.Ruler: Straight Ruler
 -
 72.Ruler: Circular Ruler
 -
 73.Ruler: Elliptical Ruler
 -
 74.Ruler: Radial Ruler
 -
 75.Ruler: Mirror Ruler
 -
 76.Ruler: Kaleidoscope Ruler
 -
 77.Ruler: Array Ruler
 -
 78.Ruler: Perspective Array Ruler
 -
 79.Drawing Tool: Straight Line
 -
 80.Drawing Tool: Rectangle
 -
 81.Drawing Tool:Circle
 -
 82.Drawing Tool:Ellipse
 -
 83.Drawing Tool:Regular Polygon
 -
 84.Drawing Tool:Bezier Curve
 -
 85.Drawing Tool:Polyline
 -
 86.Drawing Tool:Fill
 -
 87.Selection Area tool: Color Range
 -
 88.Selection Area tool: Expand/Contract Selection Area
 -
 89.Special: Liquify Pen
 -
 90.Special: Lasso Fill
 -
 91.Special: Lasso Eraser
 -
 92.Special: Copy Pen
 -
 93.Filter (Adjust Color): Brightness & Contrast
 -
 94.Filter (Adjust Color): Tone Curve
 -
 95.Filter (Adjust Color): Hue Saturation Lightness
 -
 96.Filter (Adjust Color): Color Balance
 -
 97.Filter (Adjust Color): Extract Line Drawing
 -
 98.Filter (Adjust Color): Find Edges (Handwriting)
 -
 99.Filter (Adjust Color): Find Edges
 -
 100.Filter (Adjust Color): Change Drawing Color
 -
 101.Filter (Adjust Color): Mono Color
 -
 102.Filter (Adjust Color): Grayscale
 -
 103.Filter (Adjust Color): Black & White
 -
 104.Filter (Adjust Color): Posterize
 -
 105.Filter (Adjust Color): Invert Color
 -
 106.Filter (Adjust Color): Gradation Map
 -
 107.Filter (Adjust Color): Levels Adjustment
 -
 108.Filter (Adjust Color): Replace Color
 -
 109.Filter (Blur): Gaussian Blur
 -
 110.Filter (Blur): Zooming Blur
 -
 111.Filter (Blur): Moving Blur
 -
 112.Filter (Blur):Spin Blur
 -
 113.Filter (Blur): Lens Blur
 -
 114.Filter (Blur): Mosaic
 -
 115.Filter (Blur): Unsharp Mask
 -
 116.Filter (Blur): Frosted Glass
 -
 117.Filter (Style): Stroke (Both)
 -
 118.Filter (Style): Stained Glass
 -
 119.Filter (Style): Wet Edge
 -
 120.Filter (Style): Glow (Inner)
 -
 121.Filter (Style): Bevel (Inner)
 -
 122.Filter (Style): Bevel (Outer)
 -
 123.Filter (Style): Emboss
 -
 124.Filter (Style): Relief
 -
 125.Filter (Style): Waterdrop (Rounded)
 -
 126.Filter (Style): Stroke (Outer)
 -
 127.Filter (Style): Glow (Outer)
 -
 128.Filter (Style): Satin
 -
 129.Filter (Style): Drop Shadow
 -
 130.Filter (Style): Extrude
 -
 131.Filter (Style): God Rays
 -
 132.Filter (Draw): Parallel Gradation
 -
 133.Filter (Draw): Concentric Gradation
 -
 134.Filter (Draw): Radial Line Gradation
 -
 135.Filter (Draw): Radial Line
 -
 136.Filter (Draw): Speed Line
 -
 137.Filter (Draw): Clouds
 -
 138.Filter (Draw): QR Code
 -
 139.Filter (AI): Watercolor Filter
 -
 140.Filter (AI): Background Removal
 -
 141.Filter (Artistic): Anime Background
 -
 142.Filter (Artistic): Manga Background
 -
 143.Filter (Artistic): Chromatic Aberration (Color Shift, RGB Shift)
 -
 144.Filter (Artistic): Glitch
 -
 145.Filter (Artistic): Noise
 -
 146.Filter (Artistic): Retro Game
 -
 147.Filter (Artistic): Chrome
 -
 148.Filter (Artistic): Bloom
 -
 149.Filter (Artistic): Cross Filter
 -
 150.Filter (Artistic): Sheer
 -
 151.Filter (Pixelate): Pixelate Crystalize
 -
 152.Filter (Pixelate): Hexagonal Pixelate
 -
 153.Filter (Pixelate): Square Pixelate
 -
 154.Filter (Pixelate): Triangular Pixelate
 -
 155.Filter (Pixelate): Pointillize
 -
 156.Filter (Pixelate): Dots (Hexagonal)
 -
 157.Filter (Pixelate): Dots (Square)
 -
 158.Filter (Transform): Expansion
 -
 159.Filter (Transform): Fisheye Lens
 -
 160.Filter (Transform): Sphere Lens
 -
 161.Filter (Transform): Wave
 -
 162.Filter (Transform): Ripple
 -
 163.Filter (Transform): Twirl
 -
 164.Filter (Transform): Polar Coordinates
 -
 165.Filter (Frame): Table
 -
 166.Filter (Frame): Blur Frame
 -
 167.Filter (Movie): Rain
 -
 168.Adjustment Layer
 -
 169.Create an animation
 -
 170.Manga Function: Let's create a manga manuscript
 -
 171.Manga Function: Master the Manga creation tools
 -
 172.Manga Function: Make Use of Materials
 -
 173.Manga Function: Publishing and Printing your Manga
 -
 174.Switching devices / transferring data (with Dropbox)
 -
 175.Switching devices / transferring data (with SD card on Android)
 -
 176.Switching devices / transferring data (with PC on iOS)
 -
 177.Model change / Transfer (Backup settings)
 -
 178.Settings window details
 -
 179.Change the Background Color of the Canvas
 -
 180.Details of Brush Parameters
 -
 181.Bucket tool details
 -
 182.Layer Window Details
 -
 183.Transform tool details
 -
 184.Blend mode details
 -
 185.View Menu details
 -
 186.How to upload transparent PNG onto X
 -
 187.Importing and exporting Photoshop files (PSD)
 -
 188.Posting Multiple Pages of Comic to the Online Gallery
 -
 189.Gestures, Keyboard shortcuts (iOS,iPadOS,Android versions)
 -
 190.Gestures, Keyboard shortcuts (Windows Version)
 -
 191.Display a Crosshair Symbol When Hovering the Stylus Pen
 -
 192.Set Up Palm Rejection
 -
 193.Use a Promo Code
 -
 194.Delete Account
