Tutorials
180. Details of Brush Parameters
Ibis Paint has many realistic and various brushes. Each brush has various settings, and you can create your own brush by adjusting each parameter. If you save the created brush to “Custom brush”, you can use it at any time. This section describes each parameter of the brush.
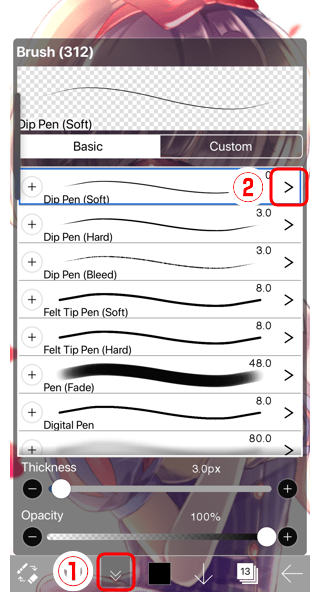
Let's display the brush settings. Open ①brush window and tap ② >.
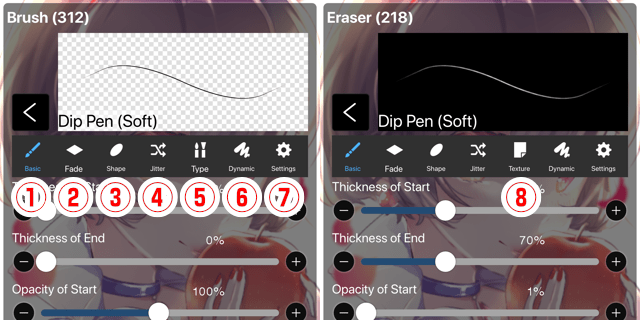
①Basic ... Makes basic settings such as brush thickness and opacity.
②Fade ... Makes brush settings such as the shape of the start and end, opacity, and blurring degree.
③Shape ... Makes settings related to brush shape such as brush pattern shape, opacity, and spacing.
④Jitter ... Makes settings such as thickness, opacity, color jitteriness, particle density, deviation, etc.
⑤Type ... Makes settings of the brush type and texture. This tab is displayed when using the brush.
⑥Dynamic ... Makes settings of the brush thickness, opacity, and blur change due to the speed and pressure of the stroke of finger or stylus pen.
⑦Settings ... Makes settings such as brush min and max thickness, blend mode, brush name and reset brush settings.
⑧Texture ... This tab is displayed when using the eraser, smudge, or blur tool. You can set the texture.
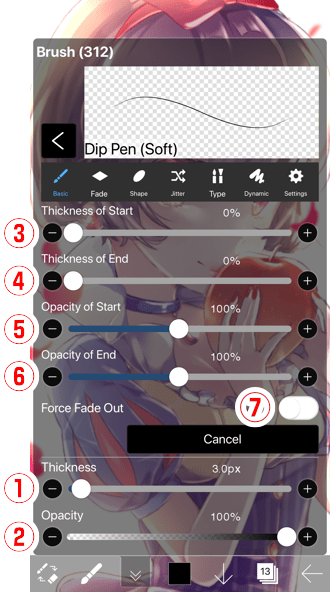
①Thinckness ... Makes setting of the brush thickness.
②Opacity ... Makes setting of the brush opacity.
③Thinckness of Start ... Makes settings of the thickness of the start of the stroke due to the ratio of the value of "Thickness".
④Thinckness of End ... Makes settings of the thickness of the end of the stroke due to the ratio of the value of "Thickness".
⑤Opacity of Start ... Makes settings of the opacity of the start of the stroke due to the ratio of the value of "Opacity".
⑥Opacity of End ... Makes settings of the opacity of the end of the stroke due to the ratio of the value of "Opacity".
⑦Force Fade Out ... Turn on to apply a stronger effect to the end of the stroke than the "Thickness" and "Opacity" settings.
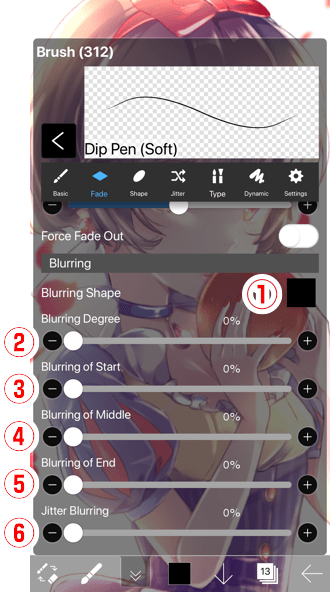
①Blurring Shape ... Makes settings of the blurring shape. Selecting "Off" disables other blur parameters.
②Blurring Degree ... Makes settings of the overall degree of blurring.
③Blurring of Start ... Makes settings of the degree of blur at the start of the stroke.
④Blurring of Middle ... Makes settings of the degree of blur at the middle of the stroke.
⑤Blurring of End ... Makes settings of the degree of blur at the end of the stroke.
⑥Jitter Blurring ... Makes settings of how randomly the blurring changes in the range upto the value of "Blurring Degree" as the maximum value. Increasing the value makes the blurring random, though at the same time it'll be less blurring.
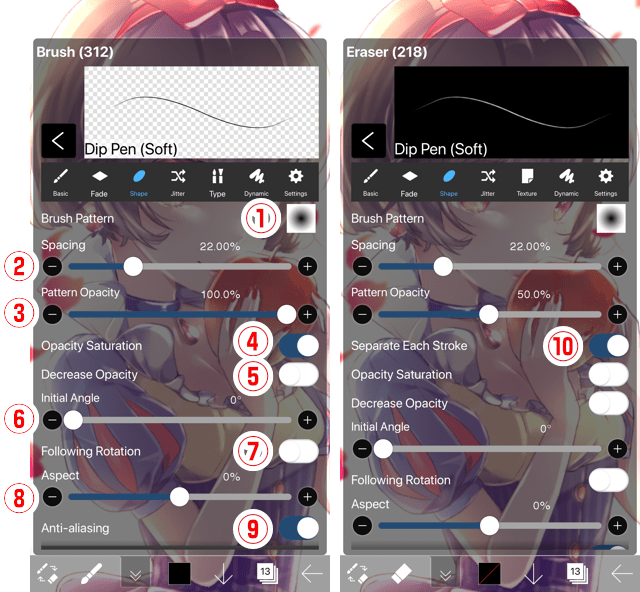
①Brush Pattern ... Makes settings of the brush shape.
②Spacing ... Makes settings of spacing of the brush pattern due to the ratio of the value of brush "Thickness".
③Pattern Opacity ... Makes settings of opacity of the brush pattern due to the ratio of the value of brush "Opacity".
④Opacity Saturation ... This function can be set while using the brush or eraser tool. When turned on, until touch-up the opacity will not be higher than the value of "Opacity" even if over-painted. If turned off, opacity will be darkened every time you paint even before touch-up.
⑤Decrease Opacity ... When turned on, it is drawn lower than the value of "Opacity". There's no effect when the value of "Opacity" is 100%.
⑥Initial Angle ... Makes settings of the angle of the brush pattern.
⑦Following Rotation ... When turned on, the angle of the brush pattern follows the direction of the stroke.
⑧Aspects ... Decreasing the value makes the brush pattern vertically longer, and increasing it makes the brush pattern wider. When the value is 0% length and width will be the same.
⑨Antialias ... When turned on, the edges of the brush pattern are drawn less jagged. When turned off, the edges of the brush pattern are jagged.
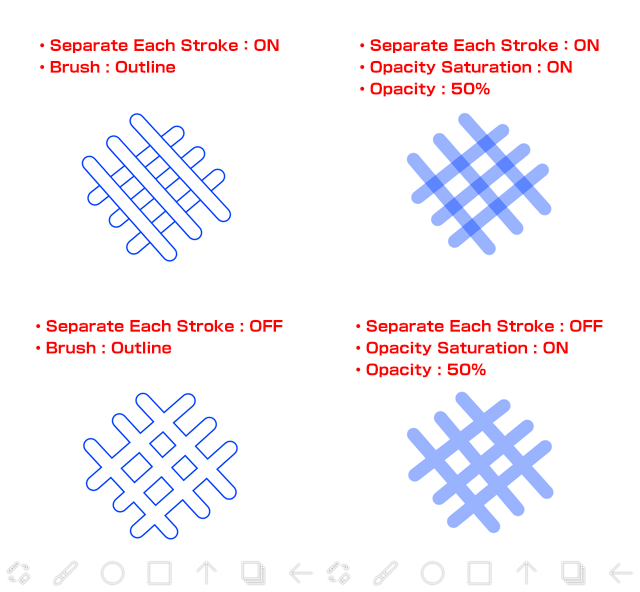
⑩Separate Each Stroke ... This function can be set while using the brush or eraser tool. When turned off, the drawing process will not be separated by each stroke. For example, if "Separate Each Stroke" is turned off and you draw with the "Outline" brush, the border of strokes are connected even if they are separated by touch-up. Also, when "Opacity Saturation" is turned on and the "Opacity" value is 50%, the opacity does not change and will be the same darkness even if overpainted.
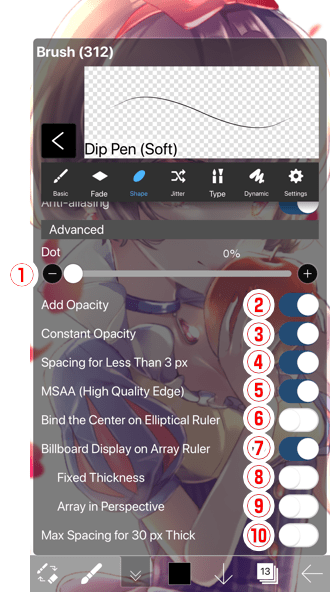
①Dots ... When the value is set to 1% or more, the brush pattern is drawn at discrete positions depending on the brush thickness.
②Add Opacity ... When turned on, the opacity of the brush pattern is drawn with "Add". So when turned off it will be more opaque.
③Constant Opacity ... When turned on, the opacity of the brush pattern is drawn with a certain density. When turned off, it draw with the opacity depending on the current "Opacity" and "Spacing" values. When turned off the drawing will be more transparent than when it's on.
④Spacing for Less Than 3 px ... When turned off, brushes with "Thickness" less than 3px are drawn as the thickness of the value it is without being changed. When turned on, the thickness becomes 3px and the drawing spacing becomes wider.
⑤MSAA (High Quality Edge) ... MSAA is shorten from "Multi-sampling anti-aliasing". When turned on, the brush pattern is drawn less jagged, improving the overall image quality.
⑥Bind the Center on Elliptical Ruler ... This function is enabled when "Following Rotation" is on. When turned on and using the brush like "Flash" with "Elliptical Ruler", you can draw the thorns toward the center of the ellipse.
⑦Billboard Display on Array Ruler ... Use this setting when the brush causes unnatural drawing during using "Array Ruler" for example, "Grass". When turned on, "Fixed Thickness" and "Array in Perspective" become configurable.
⑧Fixed Thickness ... This function can be set when "Billboard Display on Array Ruler" is on. For example, when drawing a building with a perspective using the "Array Ruler", turn this on if you want the line thickness to be uniform between the front and the back.
⑨Array in Perspective ... This function can be set when "Billboard Display on Array Ruler" is on. For example, brushes that do not drawin connected properly when used "Array Ruler" such as "Lace" or "Chain" can be drawn connected.
⑩Max Spacing for 30 px Thick ... When turned on, you can reduce the problem of the brush pattern being visible when the thickness is 30px or more for the brush for drawing lines like "Dip Pen".
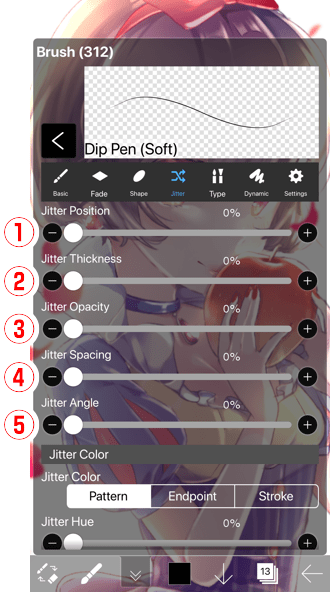
①Jitter Position ... Makes setting how randomly the thickness of the Brush Pattern will be spread due to the value of "Thickness".
②Jitter Thickness ... Makes setting how randomly the thickness of the Brush Pattern will be thick due to the value of "Thickness". It gets thinner when you set the value larger.
③Jitter Opacity ... Makes setting how randomly the opacity of the Brush Pattern will be due to the value of "Opacity". It gets transparent when you set the value larger.
④Jitter Spacing ... Makes setting how random the spacing of brush pattern is.
⑤Jitter Angle ... Makes settings how random the angle of brush pattern is.
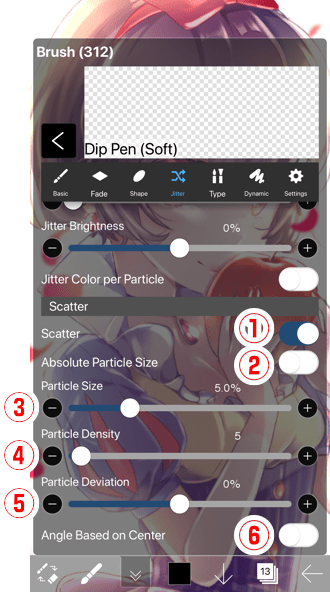
①Scatter ... When turned on, brush pattern will be drawn scattered.
②Absolute Particle Size ... This function can be set when "Scatter" is on. When turned on, you can set the size of the brush pattern to be scattered in "Particle Size" in px.
③Particle Size ... This function can be set when "Scatter" is on. You can set the brush pattern particle size in px.
④Particle Density ... This function can be set when "Scatter" is on. You can set the density of the particle of brush pattern.
⑤Particle Deviation ... This function can be set when "Scatter" is on. This function can be set when "Scatter" is on. When values is below -1% the particle scatters outwards. When values is above 1% the particle scatters inwards. When it's 0% it will scatter uniformly.
⑥Angle Based on Center ... This function can be set when "Scatter" is on. You can use the angle of "Initial Angle" as the center of the scatter. Use this when you want to align the brush pattern to the center.
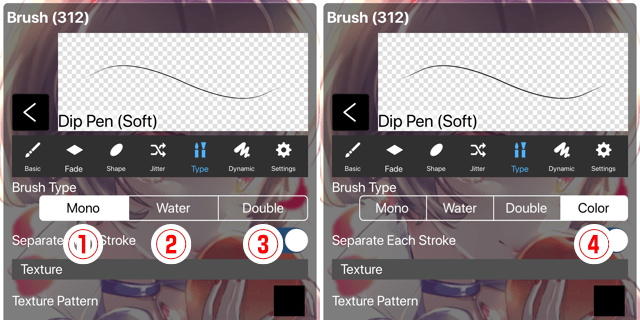
"Brush Type" is a function that can be set when using the brush. If the pattern selected in "Brush pattern" is black and white, you can select the brush type from "Mono", "Water" and "Double". If the pattern is color, you can select the brush type from "Mono", "Water", "Double" and "Color".
①Mono ... If the brush pattern is black and white, the whiteness will be converted as opacity, and if it's color, it will be monochrome.
②Water ... You can use the mixed watercolor that can mix the painted color with the color below.
③Double ... You can use the double color brush that can draw outlines and shaded texts.
④Color ... This function can be set when "Brush Pattern" is color. You can use the color brush.
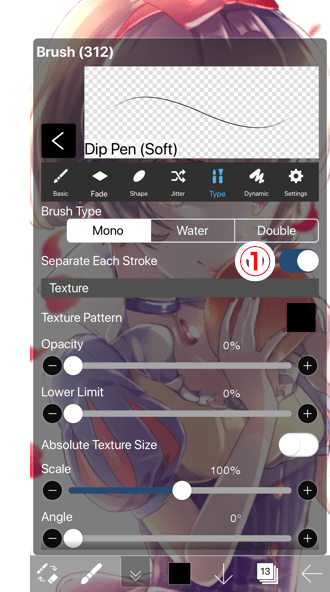
①Separate Each Stroke ... This function can be set when the brush type is "Mono". When turned off, the drawing will not be separated by strokes.
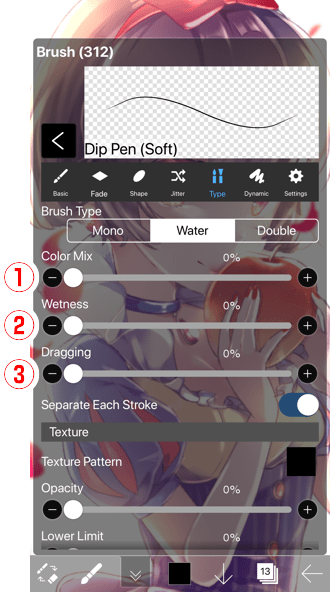
①Color Mix ... This function can be set when the brush type is "Water". You can set how much to mix the painted color with the color below.
②Wetness ... This function can be set when the brush type is "Water". You can set how much the opacity of the painted color and the color below are mixed. The higher the "Wetness" value is, the more opacity will be mixed with the color below and the color will be lighter.
③Dragging ... This function can be set when the brush type is "Water". You can set the percentage to extend the painted color without changing the opacity.
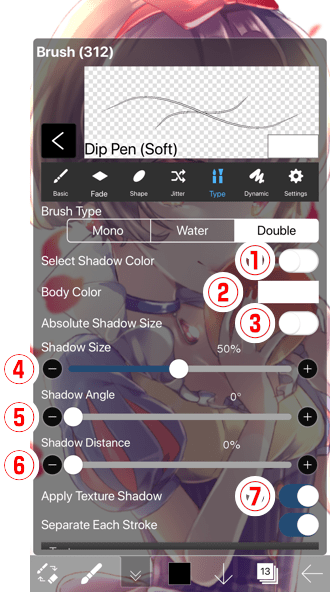
①Select Shadow Color ... This function can be set when the brush type is "Double". When turned on, the color that can be set with the "Color button" at the lower right of the "Brush Preview" is the color of the outline or shadow. When it's off, you can set the main color of the brush.
②Body Color ... This function can be set when the brush type is "Double". When "Select Shadow Color" is off, you can set the main color of the brush. When it's on, you can set the outline or shadow color.
③Absolute Shadow Size ... This function can be set when the brush type is "Double". When turned on, you can set the outline and shadow size with px. When turned off, you can set the size by the percentage of the current brush "Thickness" value.
④Shadow Size ... This function can be set when the brush type is "Double". You can set the size of the outline and shadow.
⑤Shadow Angle ... This function can be set when the brush type is "Double". You can set the outline and shadow angles.
⑥Shadow Distance ... This function can be set when the brush type is "Double". You can set how far the outline and shadow is from the center of the brush.
⑦Apply Texture Shadow ... This function can be set when the brush type is "Double". When turned on, "Texture" is also applied to outline and shadows. When turned off, it only applies to the brush.
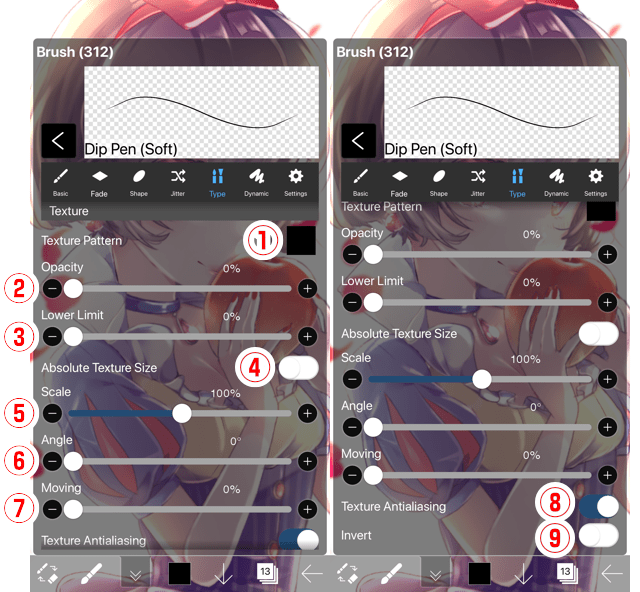
①Texture Pattern ... Makes settings of the texture pattern. When selected "Off" other parameters will be disabled. However, if "Invert" is on, other parameters will be valid even if "Off" is selected.
②Opacity ... Makes setting how dark the texture pattern is applied.
③Lower Limit ... Reduces the amount of texture pattern applied. When the value is 0%, the texture pattern cannot be overpainted, but as the value increases, it becomes possible to overpaint.
④Absolute Texture Size ... When turned on, "Scale" is applied to the original size of the texture pattern. When turned off, "Scale" is applied to the current canvas size.
⑤Scale ... Makes setting of the size of the texture pattern.
⑥Angle ... Makes setting of the angle of the texture pattern.
⑦Moving ... Makes setting whether the stroke follows the texture pattern or is fixed. When the value is increased, the drawing of the texture pattern follows the movement of the stroke, and the drawing becomes like a blurred pattern.
⑧Texture Antialiasing ... When turned on, antialiasing is applied to the texture pattern and smoothes the drawing. When using the pattern like pixel art, it's better to turn it off to draw better.
⑨Invert ... Invert the white and black parts of the texture pattern and apply.
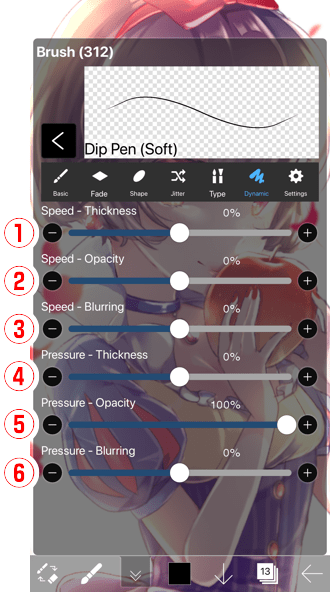
①Speed - Thickness ... Makes setting how the brush thickness changes with stroke speed. If you want to make the stroke thinner when increasing the stroke speed, then decrease the value. If you want to make it thicker, increase the value.
②Speed - Opacity ... Makes setting how the opacity of the brush changes with stroke speed. If you want the opacity to decrease when increasing the stroke speed then decrease the value. If you want to increase opacity, increase the value.
③Speed - Blurring ... Makes setting how the brush fades with stroke speed. If you want to decrease the degree of blur when increasing the stroke speed, then decrease the value. If you want to increase the degree of blur, increase the value.
④Pressure - Thickness ... Makes setting how the thickness of the brush changes with the pen pressure. If you want to make it thinner when increasing the pen pressure, then decrease the value. If you want to make it thicker, increase the value.
⑤Pressure - Opacity ... Makes setting how the opacity of the brush changes with pen pressure. If you want the opacity to decrease when increasing the pen pressure, then decrease the value. If you want to increase the opacity, increase the value.
⑥Pressure - Blurring ... Makes setting how the blur of the brush changes with the pen pressure. If you want to decrease the blur when increasing the pen pressure, then decrease the value. If you want to increase the degree of blur, increase the value.
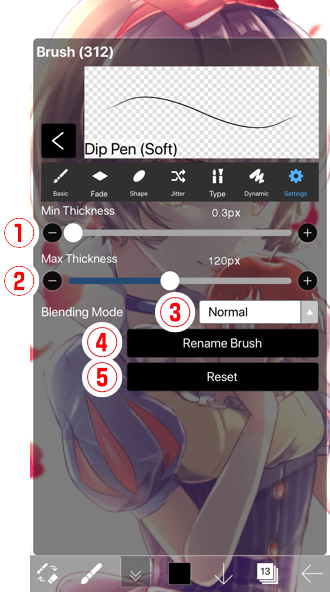
①Min Thickness ... Makes setting of the minimum value of the "Thickness" slider.
②Max Thickness ... Makes setting of the maximum value of the "Thickness" slider.
③Blending Mode ... Makes setting of the brush blend mode.
④Rename Brush ... You can change the brush name.
⑤Reset ... You can reset brush settings. The "Basic Brush" reset button can reset the brush settings to their default values. The "Custom Brush" reset button allows you to return to the settings that you had when you added the brush to the custom brush.
Chapter
-
 01.Introduction
 -
 02.Start Creating an Artwork
 -
 03.Toolbar and Tool Selection
 -
 04.Do Your Draft Sketch by Hand
 -
 05.About Layers
 -
 06.Let's Trace
 -
 07.Undo and Eraser
 -
 08.Fine Tuning Using the Lasso tool
 -
 09.Check by Reflecting Horizontally
 -
 10.Select Colors in the Color window
 -
 11.Use Color Fill for the Undercoat
 -
 12.Turn Clipping On
 -
 13.Making a Gradation (Shading)
 -
 14.Select a color from the canvas or layer
 -
 15.Set the Time before Quick Eyedropper Starts
 -
 16.Create Highlights and Shadows
 -
 17.Paste a Texture
 -
 18.Let's Merge Layers
 -
 19.Sign Your Artwork
 -
 20.View Your Artwork
 -
 21.Post Your Artwork
 -
 22.Share Your Artwork
 -
 23.Open your ibisPaint data in Clip Studio Paint
 -
 24.Prime Membership / Remove Ads Add-on (iOS,iPadOS,Android versions)
 -
 25.Prime Membership / Pro Add-on (Windows Version)
 -
 26.Synchronizing the artworks on your device with Cloud Storage
 -
 27.Save the past state of an Artwork as an IPV file
 -
 28.Rearrange artworks
 -
 29.Artworks Folder Feature
 -
 30.Make custom brush
 -
 31.Create Original Brush Patterns
 -
 32.Installing and Exporting the Custom Brush
 -
 33.Release a Custom Brush to the Online Gallery
 -
 34.Brush Export and Import
 -
 35.Search For Brushes
 -
 36.Display images to use as reference
 -
 37.Add Color to the Analog Image using Multiply
 -
 38.Stabilizer
 -
 39.Layer: Clipping is convenient
 -
 40.Layer: Changing the color with Alpha Lock
 -
 41.Layer: Let's try using Screen Tone
 -
 42.Layer: Selection Layer
 -
 43.Layer: Save Layer as Transparent PNG command
 -
 44.Layer: Naming your layers to manage them
 -
 45.Layer: Rasterize
 -
 46.Layer: Layer Folders
 -
 47.Layer: Folder Move/Transform
 -
 48.Layer: Add Layer from Canvas
 -
 49.Vector Layer
 -
 50.How to edit a brush shape
 -
 51.Contents Layer Selection
 -
 52.Apply Canvas Papers to your canvas
 -
 53.Display Grid on the Canvas
 -
 54.Save canvas as Transparent PNG
 -
 55.Make the background transparent with Eraser Bucket
 -
 56.Bucket Tool: Surrounding Fill / Surrounding Eraser
 -
 57.Putting texture to the floor with Perspective Form
 -
 58.Skirt with Mesh Form
 -
 59.Entering text with Text tool
 -
 60.Creating manga with Frame Divider tool
 -
 61.Enlarging the canvas with Canvas Size
 -
 62.Cutting off the canvas with Trim
 -
 63.Create a Manga Manuscript for Printing
 -
 64.Canvas creation with resolution (dpi) specification
 -
 65.Changing image resolution with Resize
 -
 66.Change canvas Color Mode
 -
 67.Output High-Resolution Images with AI (Artificial Intelligence)
 -
 68.AI Disturbance
 -
 69.Texture with Material tool
 -
 70.Cut, Copy, Paste
 -
 71.Ruler: Straight Ruler
 -
 72.Ruler: Circular Ruler
 -
 73.Ruler: Elliptical Ruler
 -
 74.Ruler: Radial Ruler
 -
 75.Ruler: Mirror Ruler
 -
 76.Ruler: Kaleidoscope Ruler
 -
 77.Ruler: Array Ruler
 -
 78.Ruler: Perspective Array Ruler
 -
 79.Drawing Tool: Straight Line
 -
 80.Drawing Tool: Rectangle
 -
 81.Drawing Tool:Circle
 -
 82.Drawing Tool:Ellipse
 -
 83.Drawing Tool:Regular Polygon
 -
 84.Drawing Tool:Bezier Curve
 -
 85.Drawing Tool:Polyline
 -
 86.Drawing Tool:Fill
 -
 87.Selection Area tool: Color Range
 -
 88.Selection Area tool: Expand/Contract Selection Area
 -
 89.Special: Liquify Pen
 -
 90.Special: Lasso Fill
 -
 91.Special: Lasso Eraser
 -
 92.Special: Copy Pen
 -
 93.Filter (Adjust Color): Brightness & Contrast
 -
 94.Filter (Adjust Color): Tone Curve
 -
 95.Filter (Adjust Color): Hue Saturation Lightness
 -
 96.Filter (Adjust Color): Color Balance
 -
 97.Filter (Adjust Color): Extract Line Drawing
 -
 98.Filter (Adjust Color): Find Edges (Handwriting)
 -
 99.Filter (Adjust Color): Find Edges
 -
 100.Filter (Adjust Color): Change Drawing Color
 -
 101.Filter (Adjust Color): Mono Color
 -
 102.Filter (Adjust Color): Grayscale
 -
 103.Filter (Adjust Color): Black & White
 -
 104.Filter (Adjust Color): Posterize
 -
 105.Filter (Adjust Color): Invert Color
 -
 106.Filter (Adjust Color): Gradation Map
 -
 107.Filter (Adjust Color): Levels Adjustment
 -
 108.Filter (Adjust Color): Replace Color
 -
 109.Filter (Blur): Gaussian Blur
 -
 110.Filter (Blur): Zooming Blur
 -
 111.Filter (Blur): Moving Blur
 -
 112.Filter (Blur):Spin Blur
 -
 113.Filter (Blur): Lens Blur
 -
 114.Filter (Blur): Mosaic
 -
 115.Filter (Blur): Unsharp Mask
 -
 116.Filter (Blur): Frosted Glass
 -
 117.Filter (Style): Stroke (Both)
 -
 118.Filter (Style): Stained Glass
 -
 119.Filter (Style): Wet Edge
 -
 120.Filter (Style): Glow (Inner)
 -
 121.Filter (Style): Bevel (Inner)
 -
 122.Filter (Style): Bevel (Outer)
 -
 123.Filter (Style): Emboss
 -
 124.Filter (Style): Relief
 -
 125.Filter (Style): Waterdrop (Rounded)
 -
 126.Filter (Style): Stroke (Outer)
 -
 127.Filter (Style): Glow (Outer)
 -
 128.Filter (Style): Satin
 -
 129.Filter (Style): Drop Shadow
 -
 130.Filter (Style): Extrude
 -
 131.Filter (Style): God Rays
 -
 132.Filter (Draw): Parallel Gradation
 -
 133.Filter (Draw): Concentric Gradation
 -
 134.Filter (Draw): Radial Line Gradation
 -
 135.Filter (Draw): Radial Line
 -
 136.Filter (Draw): Speed Line
 -
 137.Filter (Draw): Clouds
 -
 138.Filter (Draw): QR Code
 -
 139.Filter (AI): Watercolor Filter
 -
 140.Filter (AI): Background Removal
 -
 141.Filter (Artistic): Anime Background
 -
 142.Filter (Artistic): Manga Background
 -
 143.Filter (Artistic): Chromatic Aberration (Color Shift, RGB Shift)
 -
 144.Filter (Artistic): Glitch
 -
 145.Filter (Artistic): Noise
 -
 146.Filter (Artistic): Retro Game
 -
 147.Filter (Artistic): Chrome
 -
 148.Filter (Artistic): Bloom
 -
 149.Filter (Artistic): Cross Filter
 -
 150.Filter (Artistic): Sheer
 -
 151.Filter (Pixelate): Pixelate Crystalize
 -
 152.Filter (Pixelate): Hexagonal Pixelate
 -
 153.Filter (Pixelate): Square Pixelate
 -
 154.Filter (Pixelate): Triangular Pixelate
 -
 155.Filter (Pixelate): Pointillize
 -
 156.Filter (Pixelate): Dots (Hexagonal)
 -
 157.Filter (Pixelate): Dots (Square)
 -
 158.Filter (Transform): Expansion
 -
 159.Filter (Transform): Fisheye Lens
 -
 160.Filter (Transform): Sphere Lens
 -
 161.Filter (Transform): Wave
 -
 162.Filter (Transform): Ripple
 -
 163.Filter (Transform): Twirl
 -
 164.Filter (Transform): Polar Coordinates
 -
 165.Filter (Frame): Table
 -
 166.Filter (Frame): Blur Frame
 -
 167.Filter (Movie): Rain
 -
 168.Adjustment Layer
 -
 169.Create an animation
 -
 170.Manga Function: Let's create a manga manuscript
 -
 171.Manga Function: Master the Manga creation tools
 -
 172.Manga Function: Make Use of Materials
 -
 173.Manga Function: Publishing and Printing your Manga
 -
 174.Switching devices / transferring data (with Dropbox)
 -
 175.Switching devices / transferring data (with SD card on Android)
 -
 176.Switching devices / transferring data (with PC on iOS)
 -
 177.Model change / Transfer (Backup settings)
 -
 178.Settings window details
 -
 179.Change the Background Color of the Canvas
 -
 180.Details of Brush Parameters
 -
 181.Bucket tool details
 -
 182.Layer Window Details
 -
 183.Transform tool details
 -
 184.Blend mode details
 -
 185.View Menu details
 -
 186.How to upload transparent PNG onto X
 -
 187.Importing and exporting Photoshop files (PSD)
 -
 188.Posting Multiple Pages of Comic to the Online Gallery
 -
 189.Gestures, Keyboard shortcuts (iOS,iPadOS,Android versions)
 -
 190.Gestures, Keyboard shortcuts (Windows Version)
 -
 191.Display a Crosshair Symbol When Hovering the Stylus Pen
 -
 192.Set Up Palm Rejection
 -
 193.Use a Promo Code
 -
 194.Delete Account
